Webflow Donation Management
You've already taken control of your website with Webflow's low-code power. Now take your donation and fundraising management to the next level with our super customizable and easy-to-use Donatly Webflow app.
Getting Started
New to Donatly? Watch this comprehensive video tutorial to learn how to get started with the full installation and setup process.
Getting started video
This video covers:
- Creating your Donatly account
- Connecting to your Webflow account
- Initial setup and configuration
- Creating your first campaign
- Setting up payment gateways
- Basic customization options
1. How to Connect
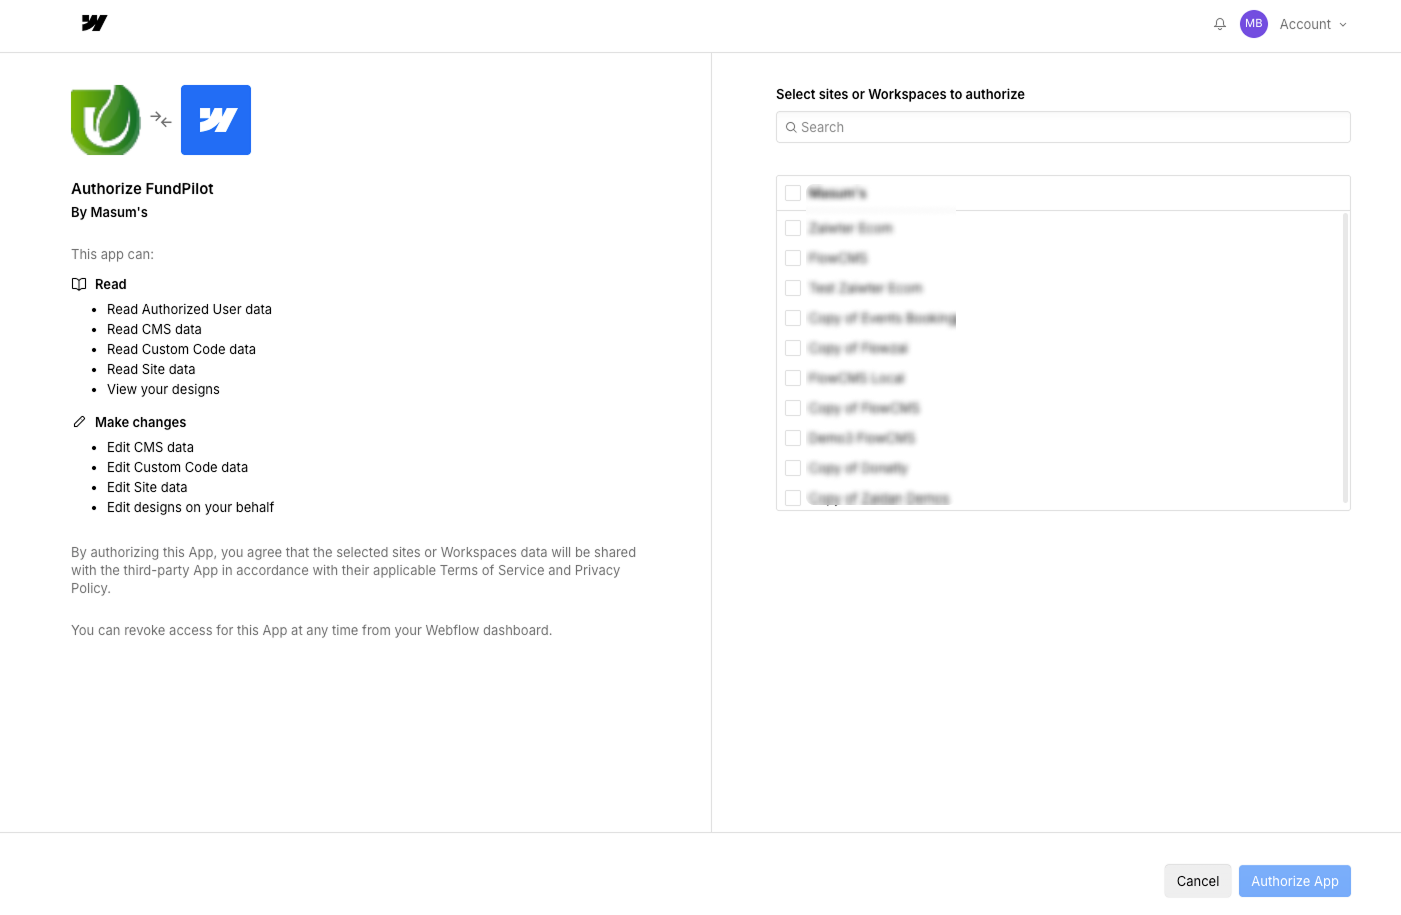
1.1 Connect With Webflow
Unlocking the potential of "Donatly" is a straightforward process. Begin by logging into your account, and seamlessly integrate it with your Webflow account. Following this, effortlessly connect to the specific website or project of your choice.
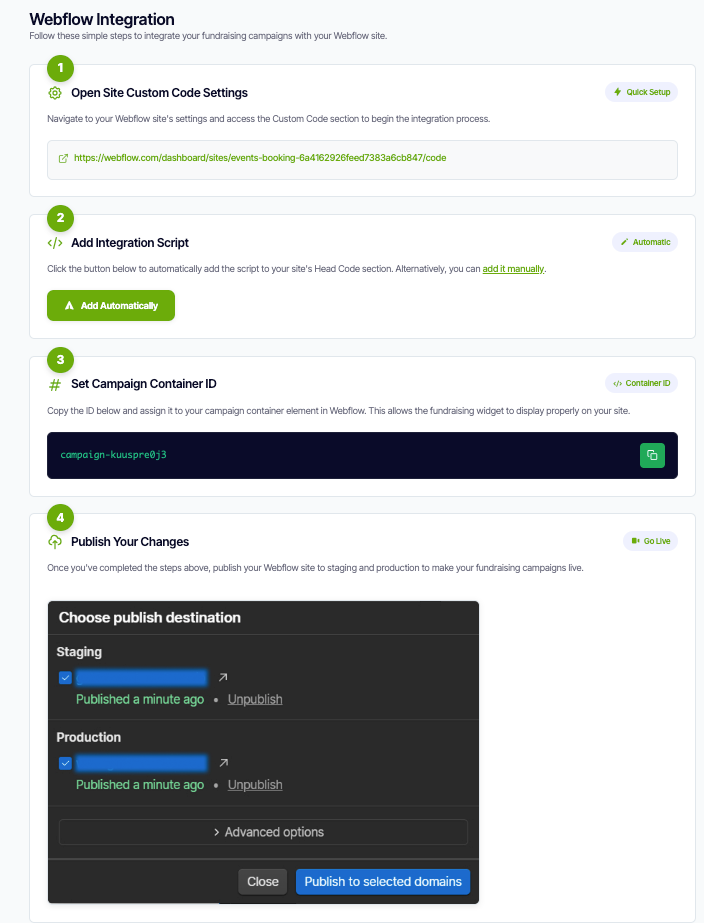
1.2 Webflow Integration
To integrate the donation campaign with Webflow:
- Open your site's Custom Code settings.
- Add the provided integration script to the
<head>section. - Copy the Campaign Container ID and assign it to the donation container element in the Webflow Designer.
- Publish your site to staging and production to activate the campaign.
2. Campaigns
On the Campaign page, admins can create and manage fundraising campaigns using built-in filters for easy organization. This allows you to tailor your fundraising efforts by adding and managing the specific campaigns or causes you support. Each campaign can be fully customized with comprehensive settings and content options to maximize engagement and donations.
2.1 How to Create a Campaign
Watch this short video tutorial to learn how to create a new fundraising campaign:
YouTube embed placeholder — replace REPLACE_WITH_YOUTUBE_VIDEO_ID with your tutorial video ID
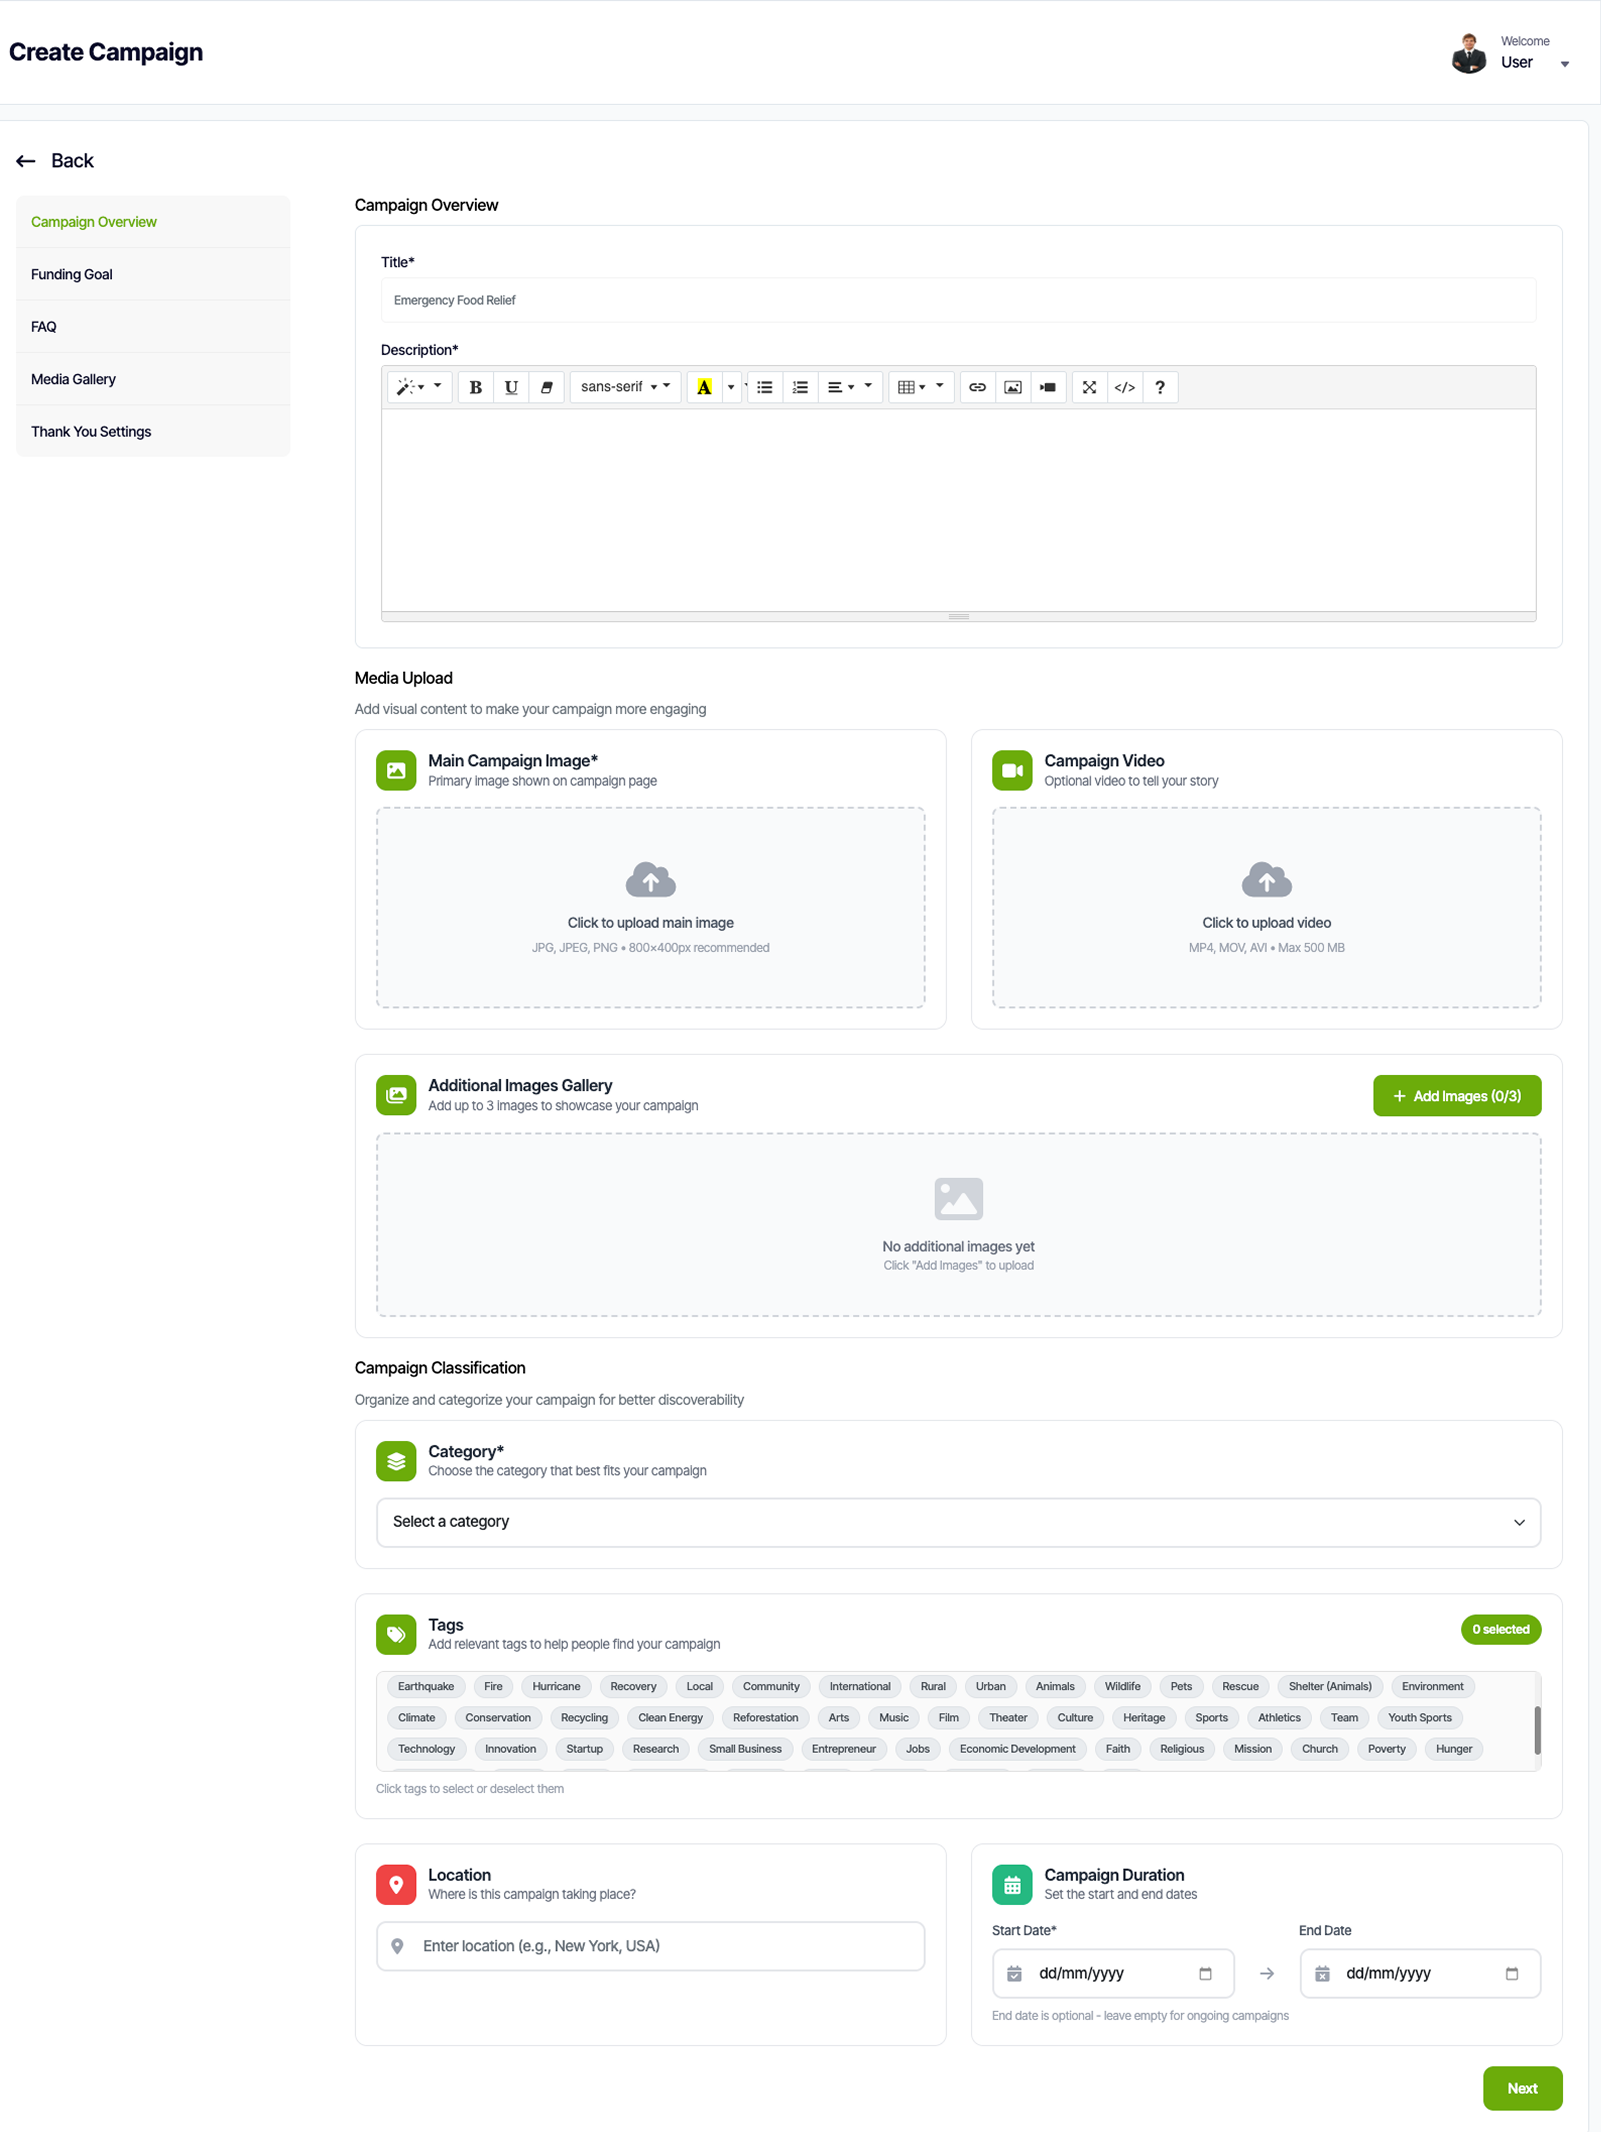
2.2 Campaign Creation Options
When creating a new campaign, you can configure various sections to provide comprehensive information and enhance donor engagement. The following options are available during campaign setup:
Campaign Overview
The overview section is where you provide the essential information about your campaign:
- Campaign Title: Create a compelling, clear title that captures the essence of your cause
- Description: Write a detailed description explaining the purpose, goals, and impact of your campaign
- Category: Select or create a category to help donors discover your campaign
- Tags: Add relevant tags for better searchability and organization
- Featured Image: Upload a high-quality image that represents your campaign
- Short Summary: Provide a brief summary that appears in campaign listings
Funding Goal
Set clear financial targets and track progress toward your fundraising objectives:
- Target Amount: Set the total fundraising goal for your campaign
- Currency: Select the currency for your campaign (can differ from organization default)
- Deadline: Set an optional end date to create urgency
- Flexible Goal: Allow the campaign to continue accepting donations after reaching the goal
- Progress Display: Choose how progress is displayed to donors (percentage, amount raised, etc.)
FAQ
Anticipate and answer common questions from potential donors:
- Add Questions: Create frequently asked questions relevant to your campaign
- Detailed Answers: Provide comprehensive answers to build trust and transparency
- Organization: Reorder FAQs to prioritize the most important questions
- Rich Text Support: Format answers with bold text, links, and lists for better readability
Media Gallery
Showcase your campaign through visual storytelling:
- Image Upload: Add multiple high-quality images to tell your campaign's story
- Video Integration: Embed videos from YouTube, Vimeo, or upload directly
- Image Captions: Add descriptive captions to provide context for each image
- Gallery Layout: Choose between grid, carousel, or masonry layouts
- Featured Media: Set a primary image or video that appears prominently
Thank You Settings
Customize the post-donation experience to maximize donor satisfaction and engagement:
- Thank You Message: Write a personalized message shown immediately after donation
- Redirect URL: Optionally redirect donors to a custom thank you page
- Social Sharing: Enable sharing buttons for donors to spread the word
- Follow-up Actions: Suggest next steps like signing up for updates or making another donation
- Impact Statement: Show donors how their contribution makes a difference
2.3 Campaign Management Actions
Each campaign provides a comprehensive set of management actions to help you maintain and optimize your fundraising efforts. These actions are accessible from the campaign list or individual campaign pages:
Edit
Modify any aspect of your campaign at any time:
- Update campaign details, descriptions, and settings
- Modify funding goals and deadlines
- Edit FAQ sections and media galleries
- Update thank you messages and redirect URLs
- Change campaign categories and tags
Change Status
Control the visibility and activity of your campaigns:
- Active: Campaign is live and accepting donations
- Paused: Temporarily stop accepting donations while keeping the campaign visible
- Completed: Mark campaign as finished, typically after reaching the goal or deadline
- Draft: Save campaigns as drafts before publishing
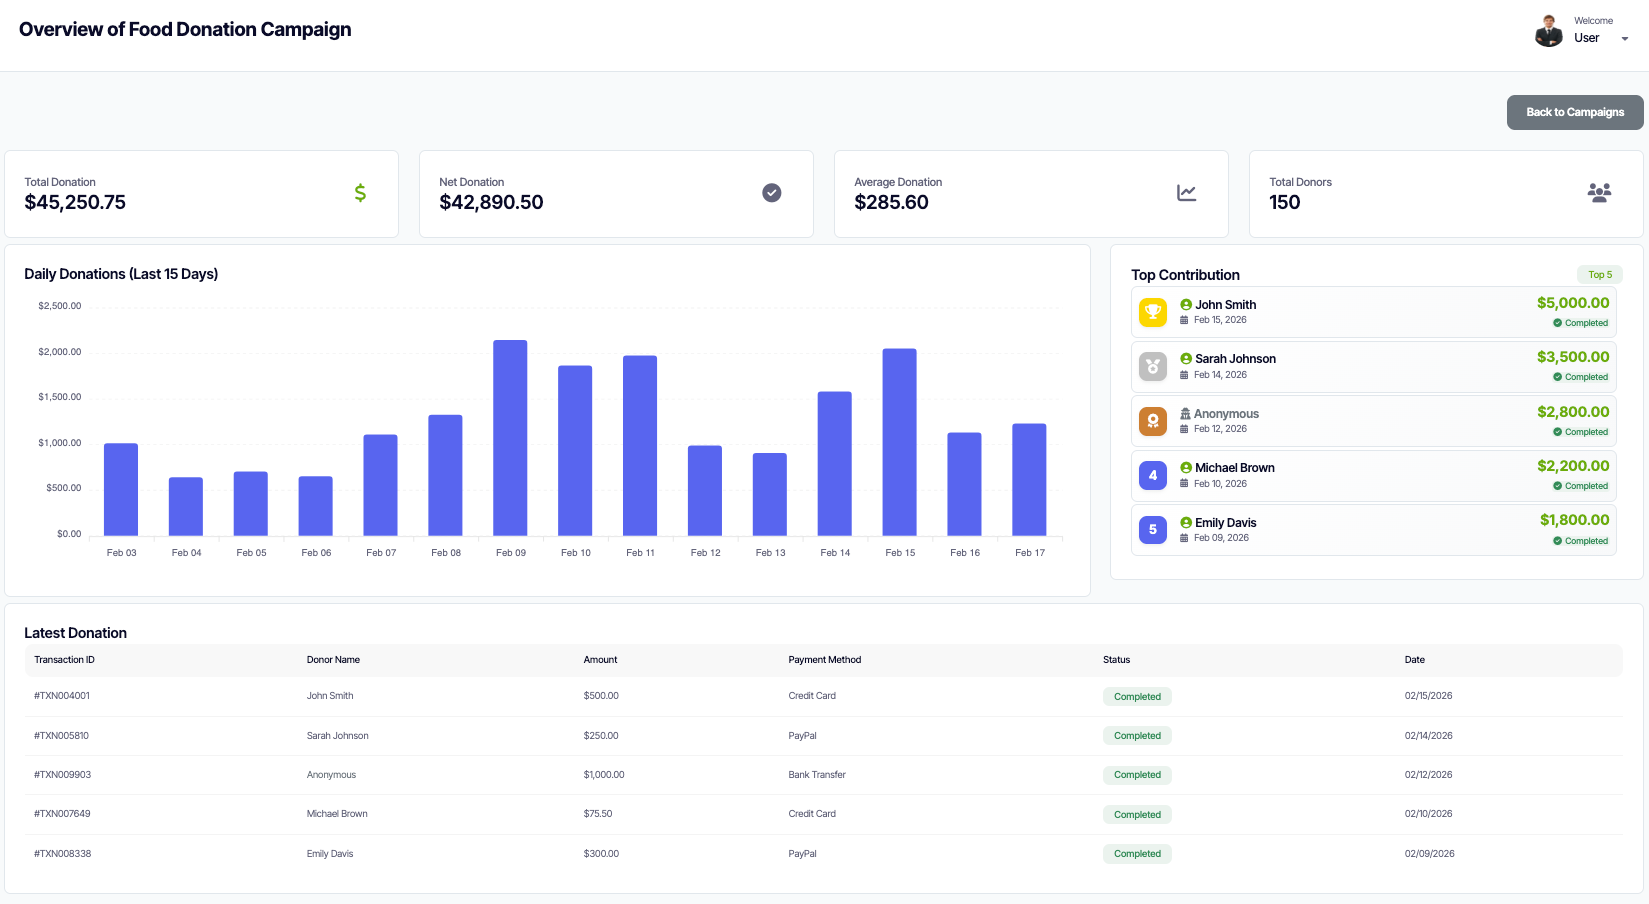
Overview
Access comprehensive analytics and performance metrics for your campaign:
- Donation Statistics: View total raised, number of donors, average donation amount
- Progress Tracking: See progress toward goal with visual indicators
- Donor Insights: Analyze donor demographics and giving patterns
- Traffic Analytics: Monitor page views, unique visitors, and engagement metrics
- Conversion Rates: Track donation conversion from visitors to donors
- Time-based Reports: View performance over different time periods
Preview
See exactly how your campaign appears to donors before making it live:
- View the campaign as it will appear on your website
- Test all interactive elements and donation forms
- Check mobile responsiveness and layout
- Verify media displays correctly
- Review all content for accuracy and formatting
Make a Copy
Quickly duplicate successful campaigns to save time when creating similar campaigns:
- Clone all campaign settings and content
- Copy media galleries and FAQ sections
- Duplicate thank you settings and customizations
- Create variations of successful campaigns for new causes
- Maintain consistency across multiple related campaigns
Delete
Remove campaigns that are no longer needed:
- Permanently delete campaigns and all associated data
- Confirm deletion to prevent accidental removal
- Note: Deleted campaigns cannot be recovered
- Consider archiving instead if you may need the data later
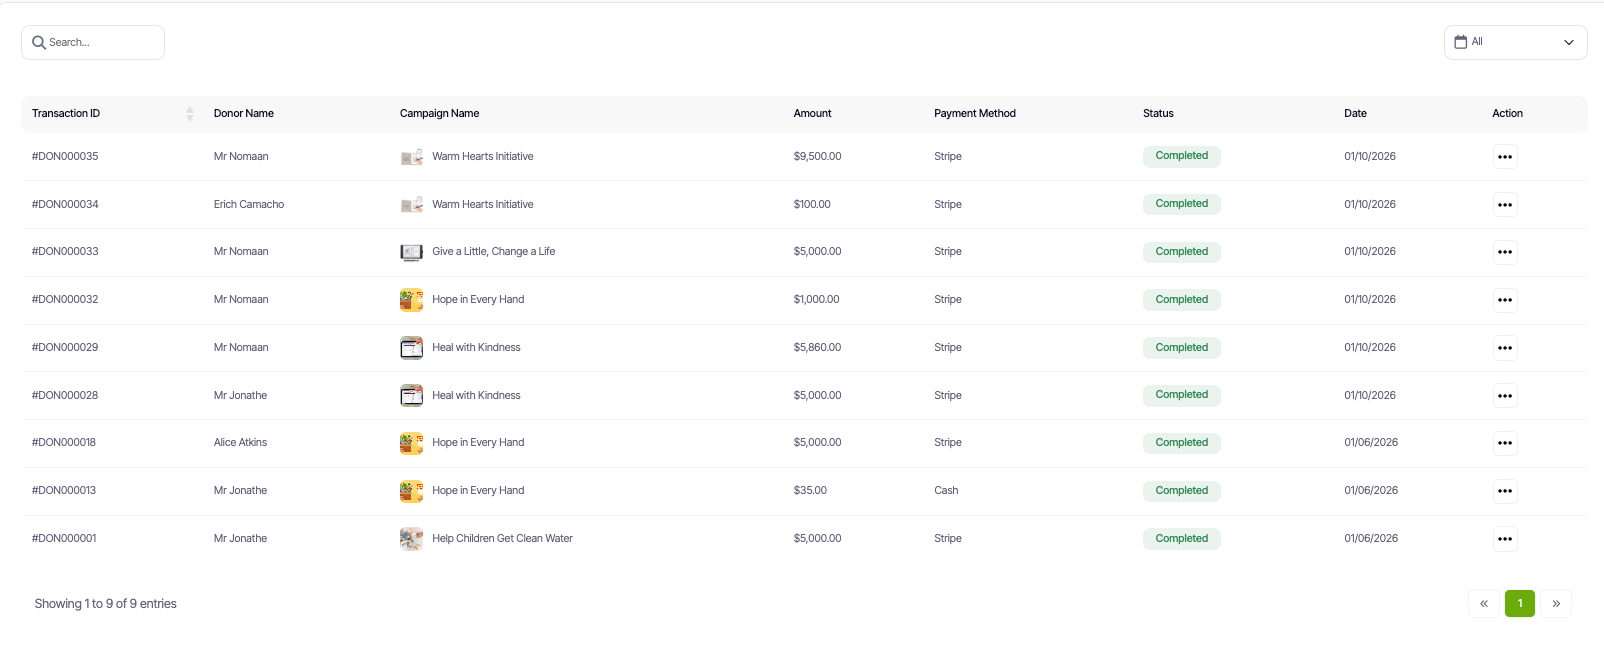
3. Donations
On the Donations page, admins can monitor the flow of contributions. The interface provides a detailed table including:
- Transaction ID
- Donor Name
- Donation Amount
- Associated Campaign
- Current Status
4. Donors
The Donors page acts as your CRM, offering a comprehensive list of all contributors. You can view email addresses, total lifetime donations, and the date of their last contribution. Admins also have the ability to manually add donors to maintain accurate offline records.

5. Donor Panel
The Donor Panel provides donors with a personalized dashboard where they can view their donation history, manage their profile, download receipts, and track their impact across campaigns. This self-service portal enhances donor engagement and reduces administrative overhead by allowing donors to access their information independently.
5.1 Accessing the Donor Panel
Donors can access their personal panel through a unique link sent via email after their first donation, or by logging in through your organization's website. The panel provides secure access to all donation-related information and account settings.
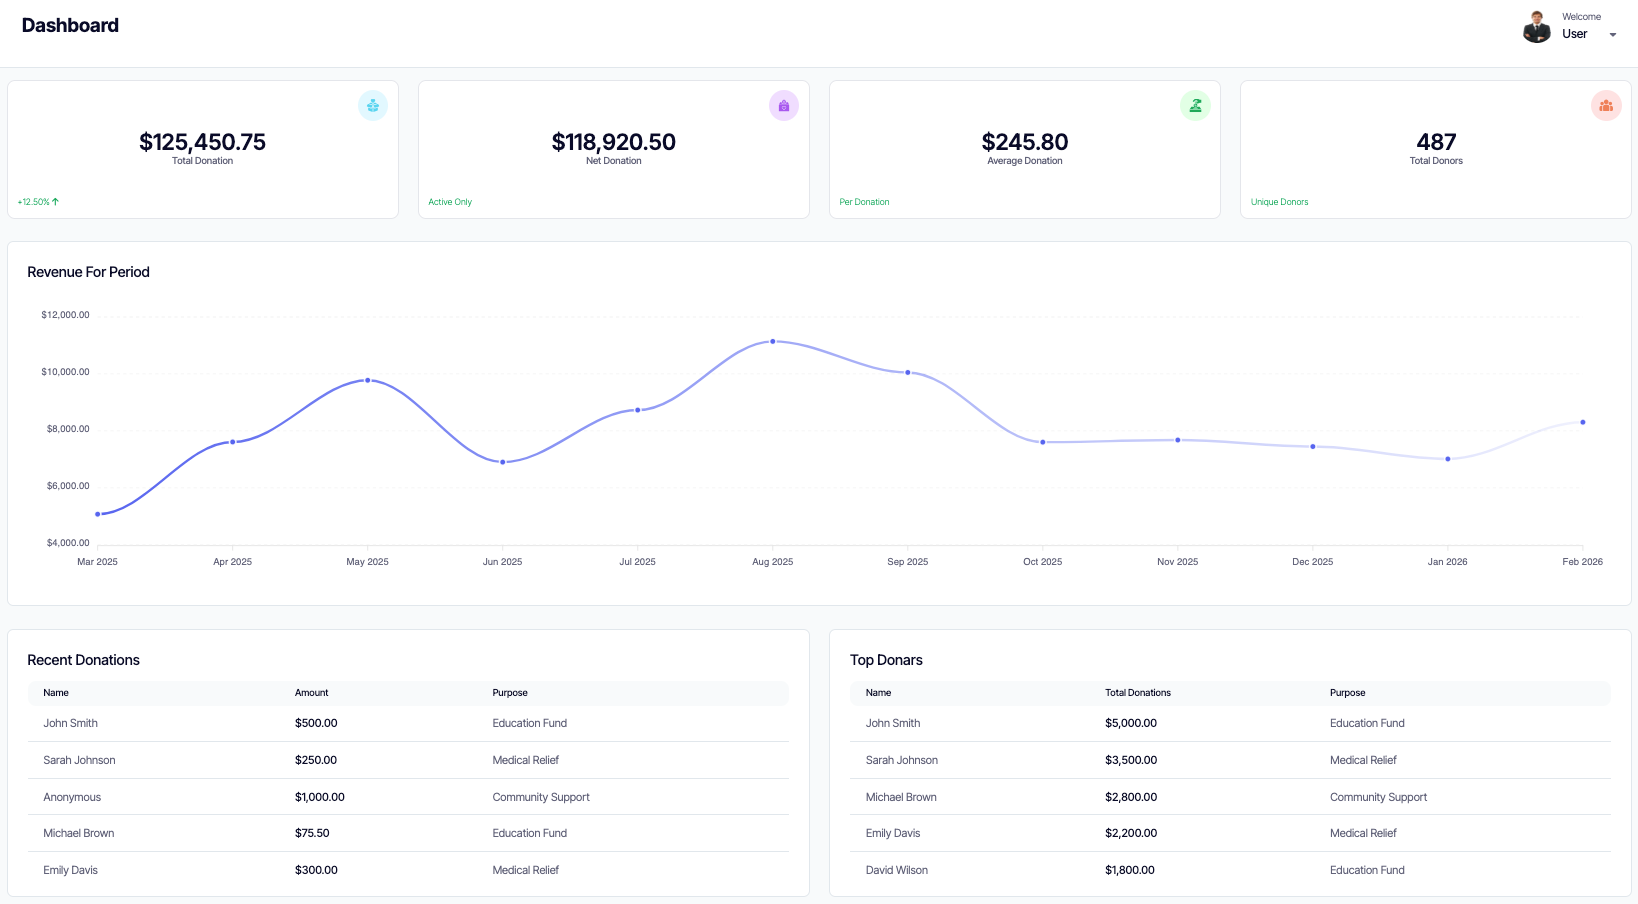
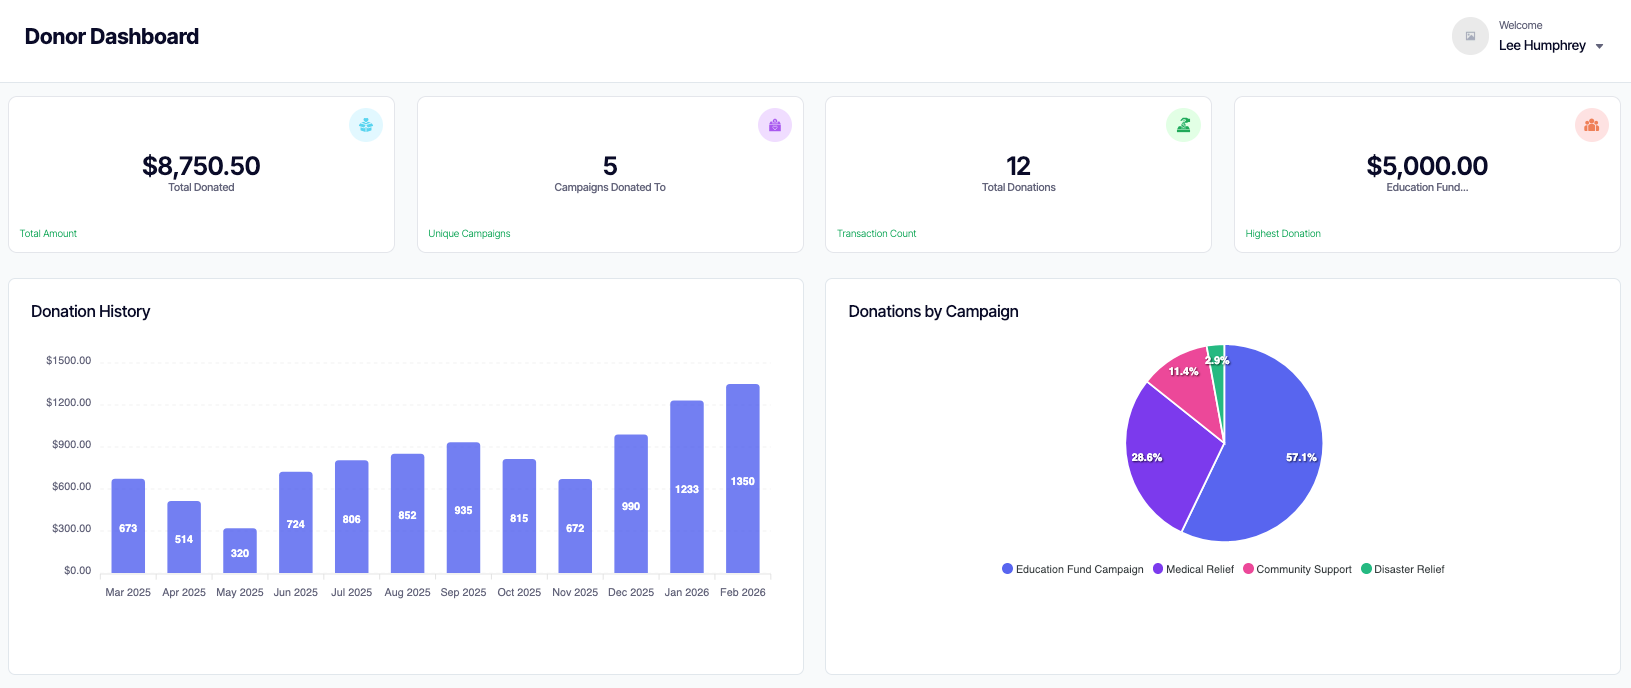
5.2 Dashboard Overview
The donor dashboard provides a comprehensive view of the donor's engagement with your organization:
- Total Donations: View lifetime contribution amount and number of donations made
- Recent Activity: See a timeline of recent donations and interactions
- Impact Summary: Visual representation of how their contributions have made a difference
- Campaigns Supported: List of all campaigns the donor has contributed to
5.3 Donation History
Donors can view a complete history of all their contributions with detailed information:
- Transaction Details: View transaction IDs, dates, amounts, and payment methods
- Campaign Information: See which campaigns received their donations
- Receipt Downloads: Download PDF receipts for tax purposes or personal records
- Filtering & Search: Filter donations by date range, campaign, or amount
- Export Options: Export donation history as CSV or PDF for record-keeping
5.4 Profile Management
Donors can update their personal information and communication preferences:
- Personal Information: Update name, email address, and contact details
- Password Management: Change account password for security
- Communication Preferences: Manage email notification settings and subscription preferences
- Privacy Settings: Control visibility of donation amounts and anonymous donation options
- Address Management: Update billing and mailing addresses for future donations
6. Manage Team
This section provides administrators with the tools to build and organize their staff and volunteer network efficiently.
6.1 Roles
Define the permissions and access levels for your organization. Create custom roles (e.g., "Finance Manager", "Campaign Coordinator", or "Volunteer Viewer") to ensure team members only access tools and data relevant to their specific responsibilities.
6.2 Team Members
Invite new contributors via email and assign them a predefined role. Manage your directory to monitor activity and revoke access as needed to maintain high security.

7. Settings
The Settings section is your central hub for configuring all aspects of your Donatly account. Here you can customize everything from branding and communications to payment processing and visual styling. Each setting category provides comprehensive options to ensure your donation platform perfectly aligns with your organization's brand identity and operational requirements.
7.1 Invoice Settings
Professional invoicing is crucial for maintaining trust with your donors and ensuring proper record-keeping. The Invoice Settings allow you to create branded, professional receipts that reflect your organization's identity. Configure your organization details and branding to ensure all invoices and receipts display accurate and professional information.
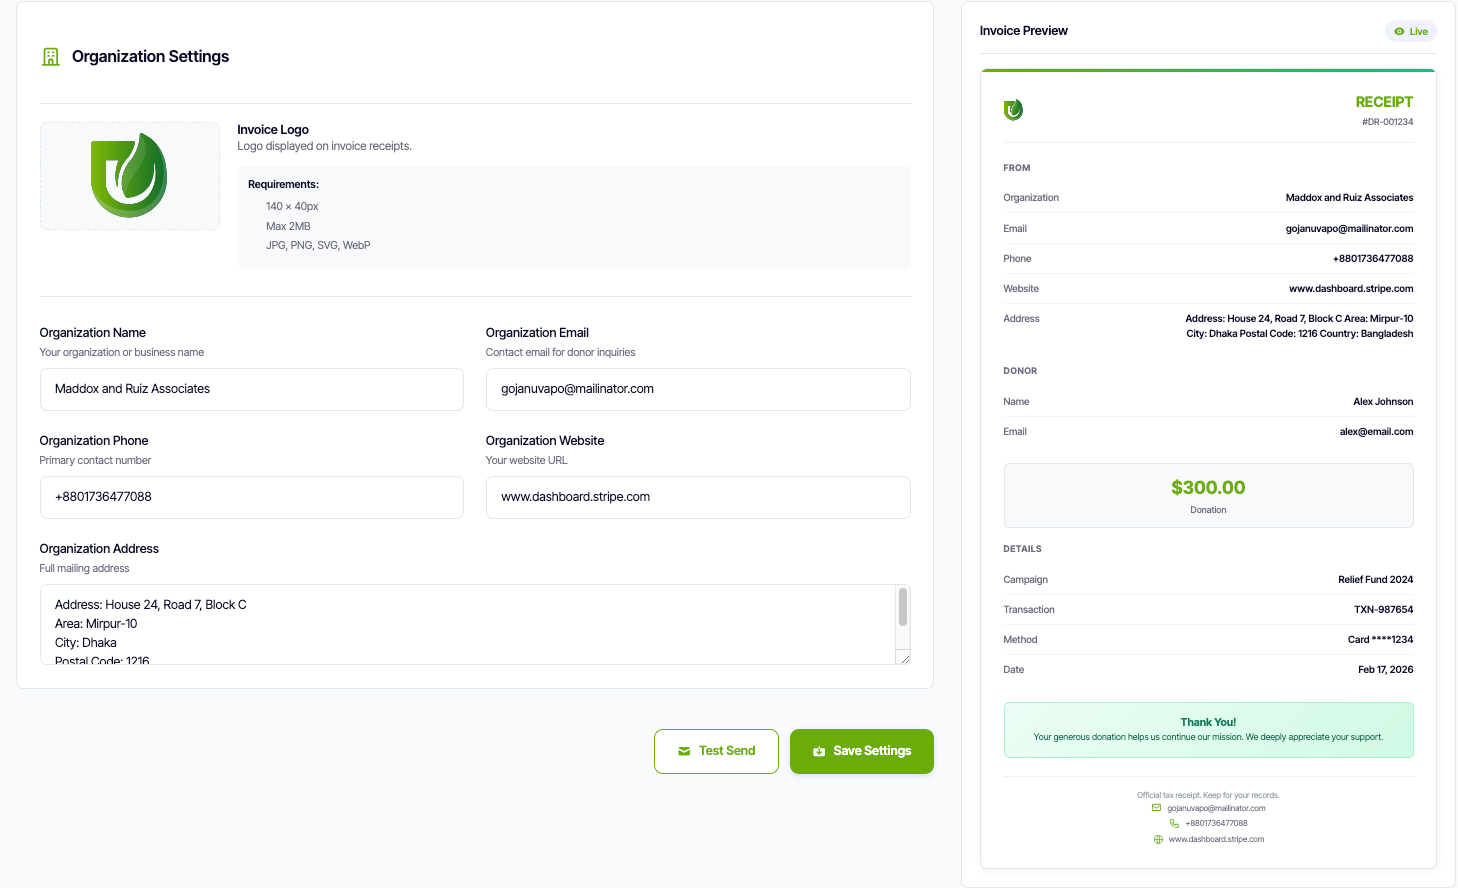
Organization Settings
Configure your organization's details that will appear on all invoice receipts:
Logo
Upload your organization's logo to be displayed on invoice receipts. This logo will appear on all donation receipts and invoices sent to your donors.
- Invoice Logo: Logo displayed on invoice receipts
Organization Information
Provide your organization's contact and business details:
- Organization Name: Your organization or business name as it should appear on invoices
- Organization Email: Contact email address for donor inquiries and support
- Organization Phone: Primary contact number for your organization
- Organization Website: Your website URL to be included on receipts
- Organization Address: Physical address or mailing address for your organization
Additional Features:
- Template Customization: Customize invoice layouts, colors, and formatting to match your brand guidelines
- Test Invoices: Send test invoices to verify formatting and ensure professional presentation
- Tax Information: Configure tax ID numbers and compliance information for proper documentation
- Automated Delivery: Configure automatic email delivery of receipts upon successful donations
7.2 Email Templates
Effective communication with donors is essential for building lasting relationships. The Email Templates section enables you to create, customize, and manage all automated emails sent through your Donatly platform. Use dynamic tags to personalize messages and ensure every communication feels authentic and engaging.
Available email types and customization options:
- Dynamic Tags: Use tags like {donor_name}, {campaign_name}, {amount}, and {date} for personalization
- HTML Editor: Rich text editor for creating visually appealing email designs
- Preview & Testing: Preview templates before deployment and send test emails to verify formatting

7.3 Payment Gateway
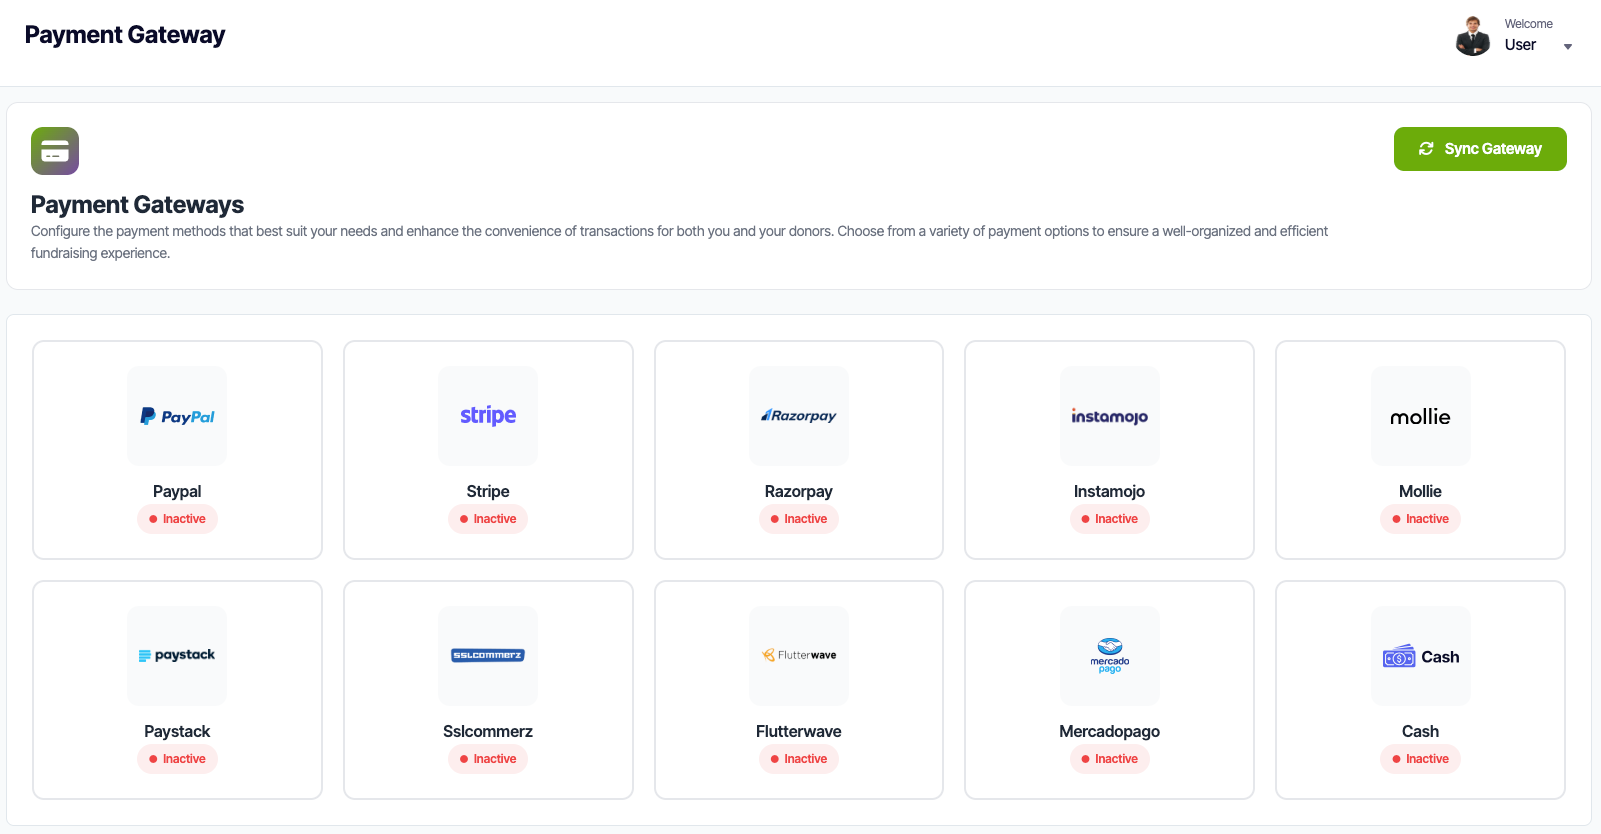
Secure payment processing is the foundation of any successful fundraising platform. The Payment Gateway settings allow you to integrate and configure multiple payment processors, ensuring reliable and secure transaction handling. Donatly supports a wide range of payment gateways to accommodate donors from different regions and preferences.
Available Payment Gateways
Connect and configure any of the following payment processors based on your organization's needs and geographic coverage:
- PayPal: Global payment solution supporting PayPal accounts and credit/debit cards
- Stripe: Comprehensive payment platform for credit cards, digital wallets, and bank transfers
- Razorpay: Popular payment gateway for India, supporting UPI, cards, net banking, and wallets
- Instamojo: Indian payment gateway with support for cards, UPI, net banking, and wallets
- Mollie: European payment service provider supporting multiple payment methods across Europe
- Paystack: Leading payment gateway for Africa, supporting cards, bank transfers, and mobile money
- SSLCommerz: Payment gateway for Bangladesh, supporting cards, mobile banking, and bank transfers
- Flutterwave: Pan-African payment platform supporting cards, bank transfers, and mobile money
- MercadoPago: Latin American payment solution supporting cards, bank transfers, and cash payments
Configuration Options
Each payment gateway can be configured with the following settings:
- API Credentials: Securely store API keys, secret keys, and merchant IDs for each gateway
- Activation Status: Enable or disable individual payment gateways as needed
- Webhook Management: Configure webhook endpoints to receive real-time transaction notifications
- Security Settings: Manage API credentials securely with encrypted storage and access controls
- Transaction Fees: View and configure how transaction fees are handled and displayed
- Test Mode: Switch between test and live modes for safe testing before going live
- Currency Support: Configure supported currencies for each payment gateway
- Payment Methods: Enable or disable specific payment methods per gateway (cards, bank transfers, etc.)
Note: You can activate multiple payment gateways simultaneously to provide donors with more payment options. Each gateway can be independently configured and toggled on or off based on your needs.
7.4 Currency Settings
Global fundraising requires proper currency handling and localization. The Currency Settings section allows you to configure how currencies are displayed, formatted, and processed across your entire platform. Set your primary currency, define decimal preferences, and ensure proper localization for international donors.
Currency configuration features:
- Primary Currency: Set your organization's default currency for all campaigns and transactions
- Currency Symbol: Customize how currency symbols are displayed ($, €, £, etc.)
- Localization: Set locale-specific formatting for dates, numbers, and currency display
7.5 Campaign Customizer
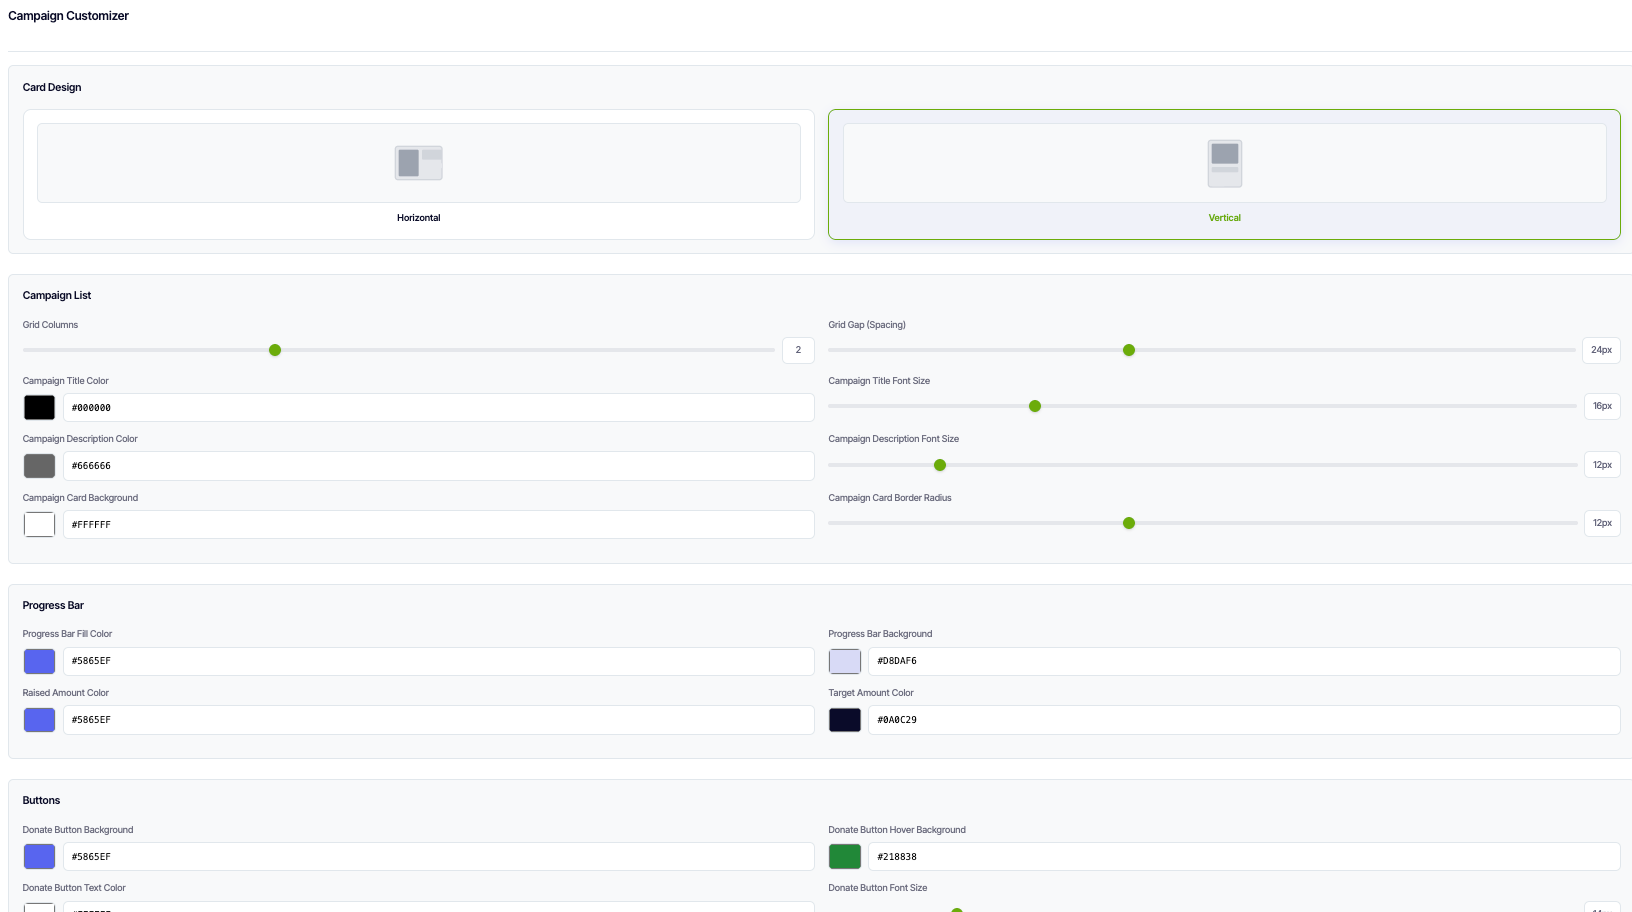
The Campaign Customizer provides powerful tools to personalize the appearance and behavior of your donation campaigns. This feature allows you to create consistent branding across all campaigns while maintaining flexibility for individual campaign customization. Configure default styles, layouts, and interactive elements that will be applied to your campaigns.
Card Design
Choose the layout orientation for your campaign cards:
- Horizontal: Display campaign cards in a horizontal layout with side-by-side content
- Vertical: Display campaign cards in a vertical layout with stacked content
Campaign List
Customize the appearance of campaign cards in your listing page:
- Grid Columns: Set the number of columns for campaign grid layout
- Grid Gap (Spacing): Control spacing between campaign cards
- Campaign Title Color: Set the color for campaign titles
- Campaign Title Font Size: Define the font size for campaign titles
- Campaign Description Color: Set the color for campaign descriptions
- Campaign Description Font Size: Define the font size for campaign descriptions
- Campaign Card Background: Set the background color for campaign cards
- Campaign Card Border Radius: Control the rounded corners of campaign cards
Progress Bar
Style the progress indicators that show fundraising progress:
- Progress Bar Fill Color: Set the color of the filled portion of the progress bar
- Progress Bar Background: Set the background color of the progress bar track
- Raised Amount Color: Define the color for the raised amount text
- Target Amount Color: Set the color for the target amount text
Buttons
Customize the appearance and behavior of donation buttons:
- Donate Button Background: Set the background color for donate buttons
- Donate Button Hover Background: Define the background color when hovering over donate buttons
- Donate Button Text Color: Set the text color for donate buttons
- Donate Button Font Size: Define the font size for button text
- Donate Button Border Radius: Control the rounded corners of donate buttons
Campaign Detail
Style the individual campaign detail pages:
- Detail Title Color: Set the color for campaign detail page titles
- Detail Title Font Size: Define the font size for detail page titles
- Detail Description Color: Set the color for campaign detail descriptions
- Detail Description Font Size: Define the font size for detail descriptions
- Raised Amount Color (Detail): Set the color for raised amount on detail pages
- Raised Amount Font Size: Define the font size for raised amount text on detail pages
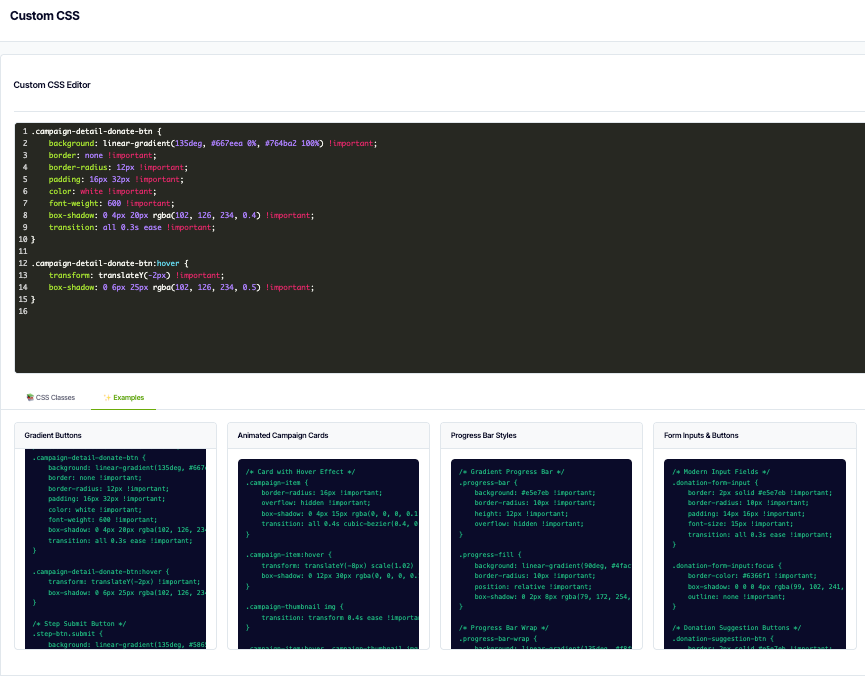
7.6 Custom CSS
Inject custom CSS code to achieve pixel-perfect control over your Donatly interface, ensuring seamless integration with your Webflow site's design language.
Campaign List
Style campaign cards, grid layouts, filters, search bars, and pagination.
Campaign Detail
Customize hero sections, content layouts, progress displays, media galleries, and donor lists.
Campaign Tabs & Gallery
Style tab navigation, content panels, image galleries, video players, and carousel controls.
Donation Forms
Customize form layouts, input fields, amount selection, validation messages, and submit buttons.
Checkout Page
Style checkout layout, order summary, payment methods, billing forms, and progress indicators.
Donation Success
Customize success messages, confirmation details, social sharing buttons, and call-to-actions.
Additional Features: Live preview, code validation, version control, responsive design support, and comprehensive documentation.
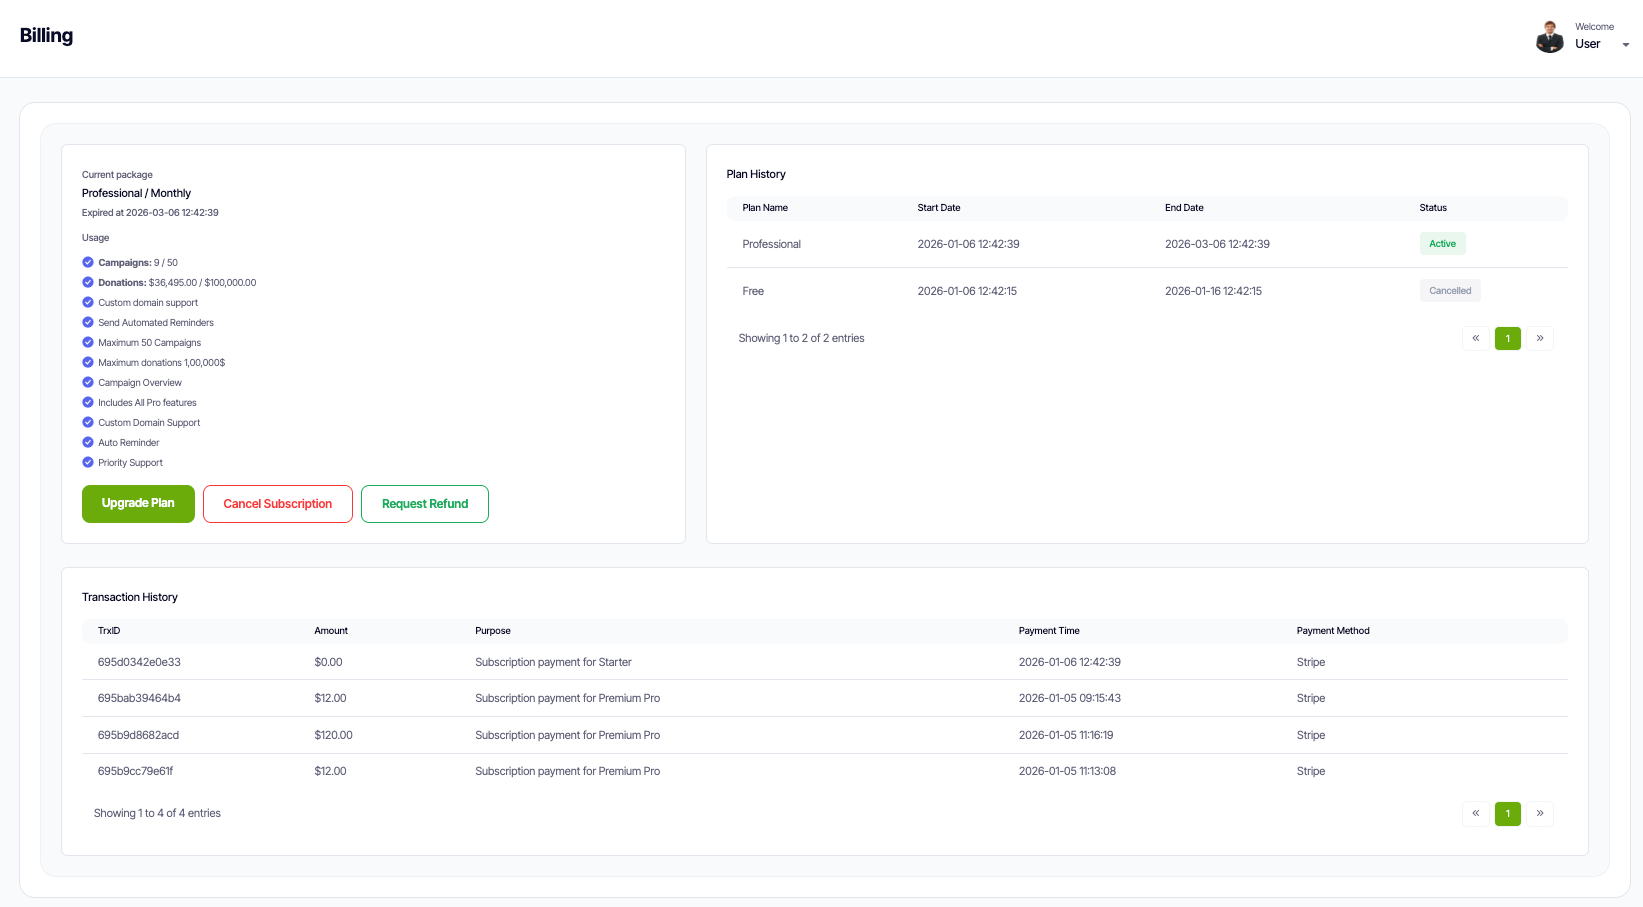
8. Pricing and Billing
On the Pricing and Billing page, admins can view their current plan and manage billing details, including payment methods and transaction history. Within this section, users can also securely cancel their subscription or request a refund based on the organization's eligibility criteria.